
Marble Stain Removal: Identifying Stains And Acid Etches
Last Updated on November 16, 2026 by David
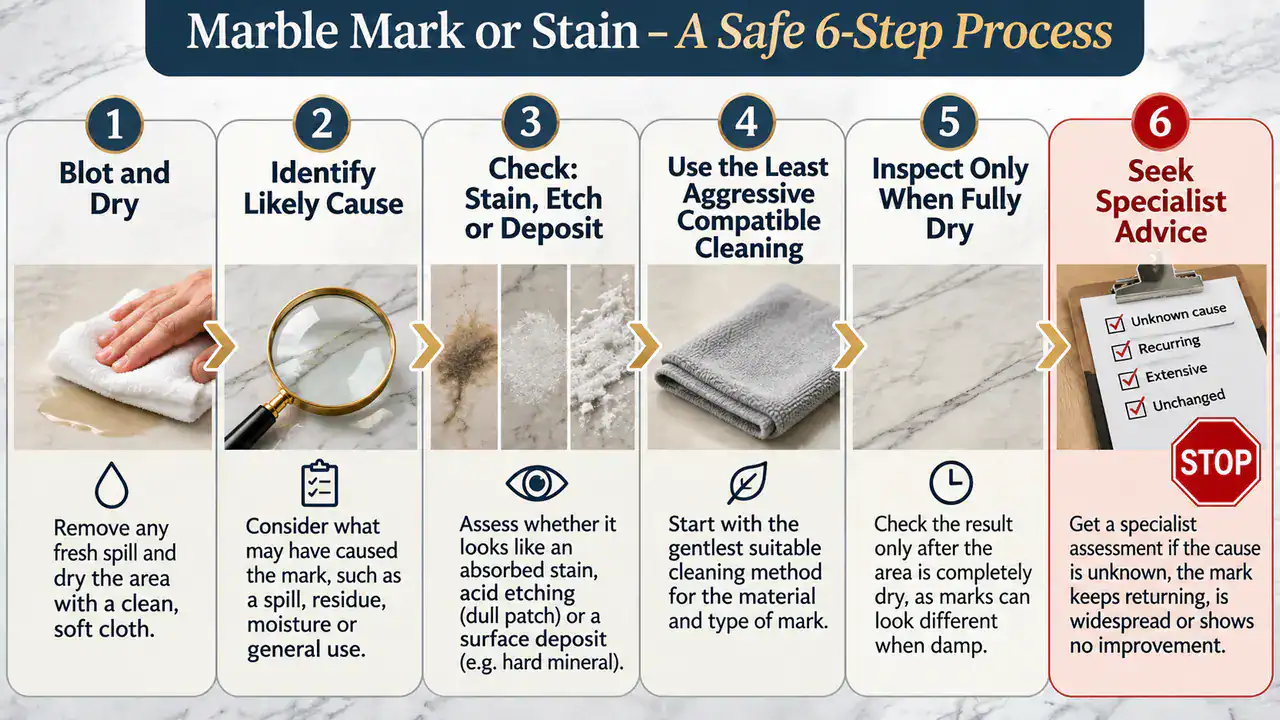
To remove a stain from marble tiles safely, first establish whether the mark is absorbed staining, a surface deposit or damage to the stone. Blot fresh spills, clean gently with a marble-compatible pH-neutral cleaner and assess the dry surface. A remaining stain may need a contaminant-specific treatment; a dull acid etch needs specialist surface correction, not stronger cleaning.
There is no single stain remover suitable for every marble mark. The wrong treatment can leave the original discolouration in place and add a dull patch around it.
First, work out what kind of mark you have
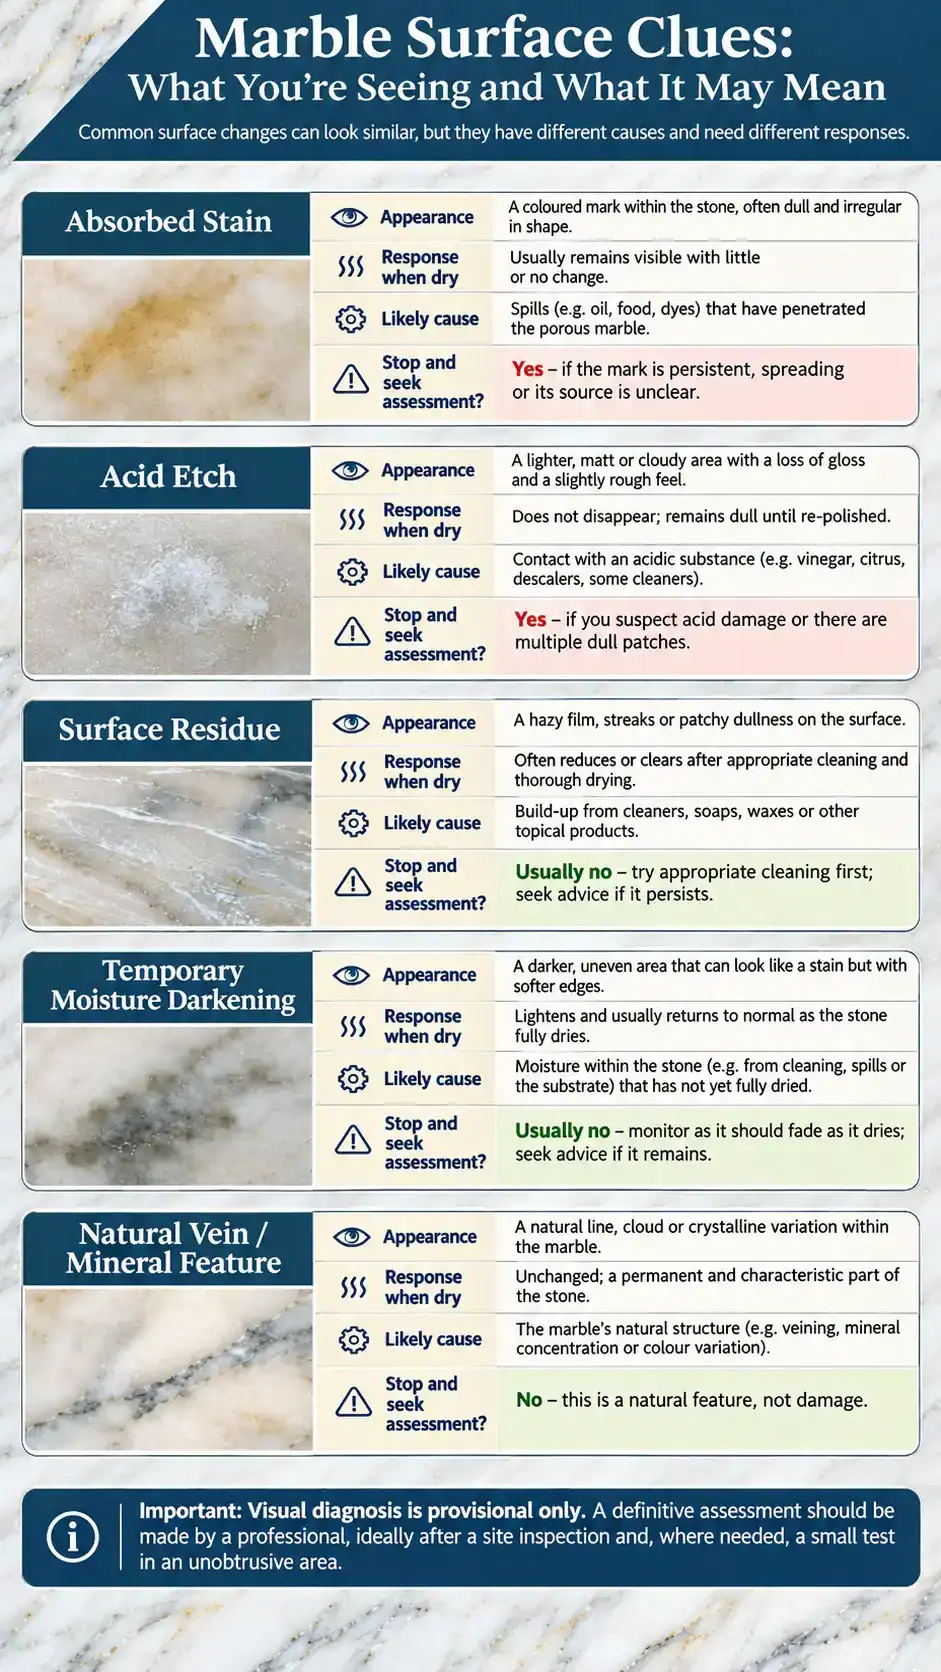
Look at the clean, dry tile from several angles, particularly where light reflects across it. Note what was spilled, when the mark appeared and whether it changes as the floor dries. These clues guide treatment, but appearance alone cannot always confirm the cause.
| What you notice | Possible explanation | Safest next step |
|---|---|---|
| A darker or coloured patch that remains after gentle cleaning and drying | Absorbed oil, food, ink or another contaminant | Identify the likely source before choosing a stain-specific treatment. |
| A dull, pale or rough patch, especially after a food, drink or cleaner spill | Acid etching, although residues can also dull the surface | Rule out removable residue, then seek advice on polishing or honing. |
| A smear or film that changes with cleaning | Cleaning residue, grease, wax or an old coating | Test compatible cleaning; persistent coatings may need specialist stripping. |
| A raised or crusty mark around regularly wet areas | Hard-water mineral deposits | Do not use descaler. Arrange marble-safe mechanical removal. |
| Loose white powder, particularly if it returns | Salt deposits associated with moisture movement through the floor | Remove loose material gently and assess recurrence before sealing. |
| General greying or dull traffic lanes rather than an isolated stain | Soiling, micro-scratching or both | Assess cleaning first; abrasion damage requires surface refinement. |
Natural veins and mineral features can also resemble stains. Marble absorption varies, and a trade name does not reliably establish porosity or treatment response. Do not try to bleach out a feature simply because it differs from the surrounding stone.
What to do immediately after a spill
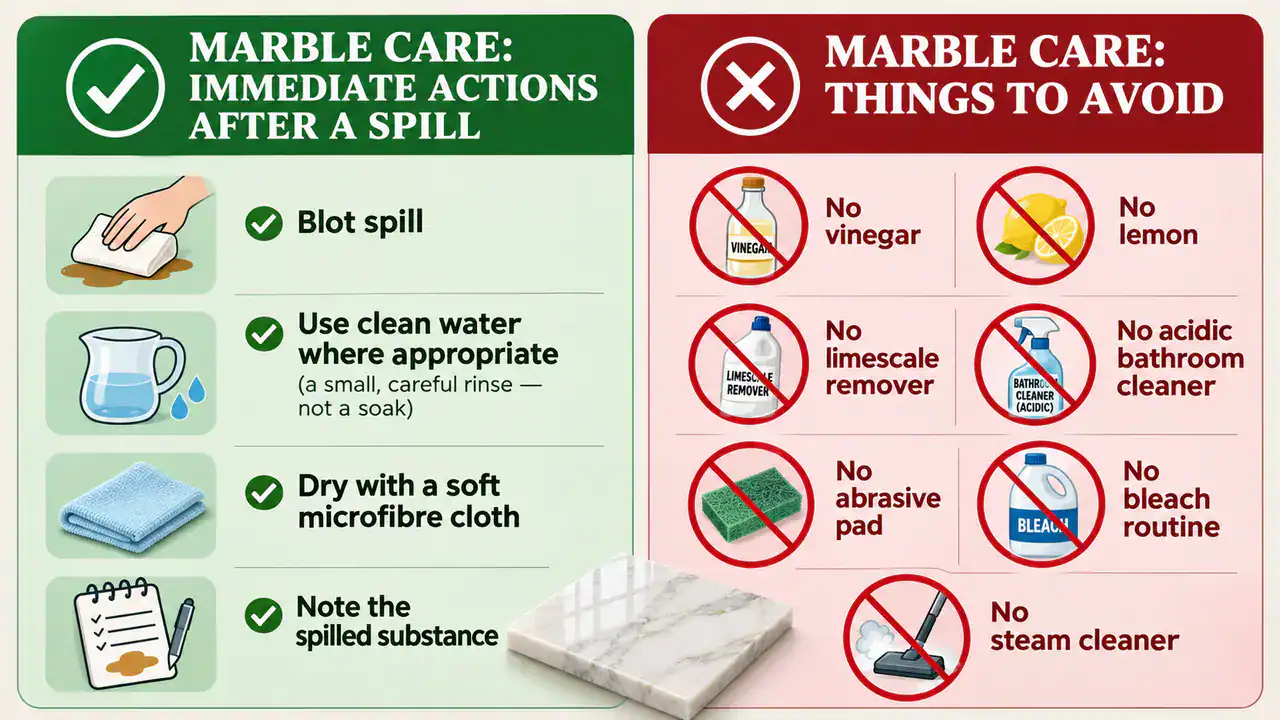
- Blot rather than spread. Lift liquid with a clean absorbent cloth or plain paper towel. Remove solid material carefully without dragging it across the tiles.
- Clean gently. Use a small amount of suitable low-residue pH-neutral cleaner, following its instructions. It must be approved for the marble and its finish—not merely labelled “stone cleaner”.
- Remove the residue. Wipe with a clean, lightly dampened cloth, changing it as needed, then dry the surface. Avoid flooding joints or fissures.
- Reassess when dry. Temporary darkening from moisture can confuse the picture. Do not judge the result while the tile is still wet.
- Stop if the mark persists. Record the likely source and the products already used before seeking specialist advice.
Never mix cleaning chemicals. Avoid vinegar, lemon juice, acidic bathroom cleaners and limescale removers: all can etch marble, even when diluted. Also avoid abrasive pads, routine bleach-based cleaning and steam cleaning, which can affect the finish, sealers or joints.
Is it a stain or an acid etch?
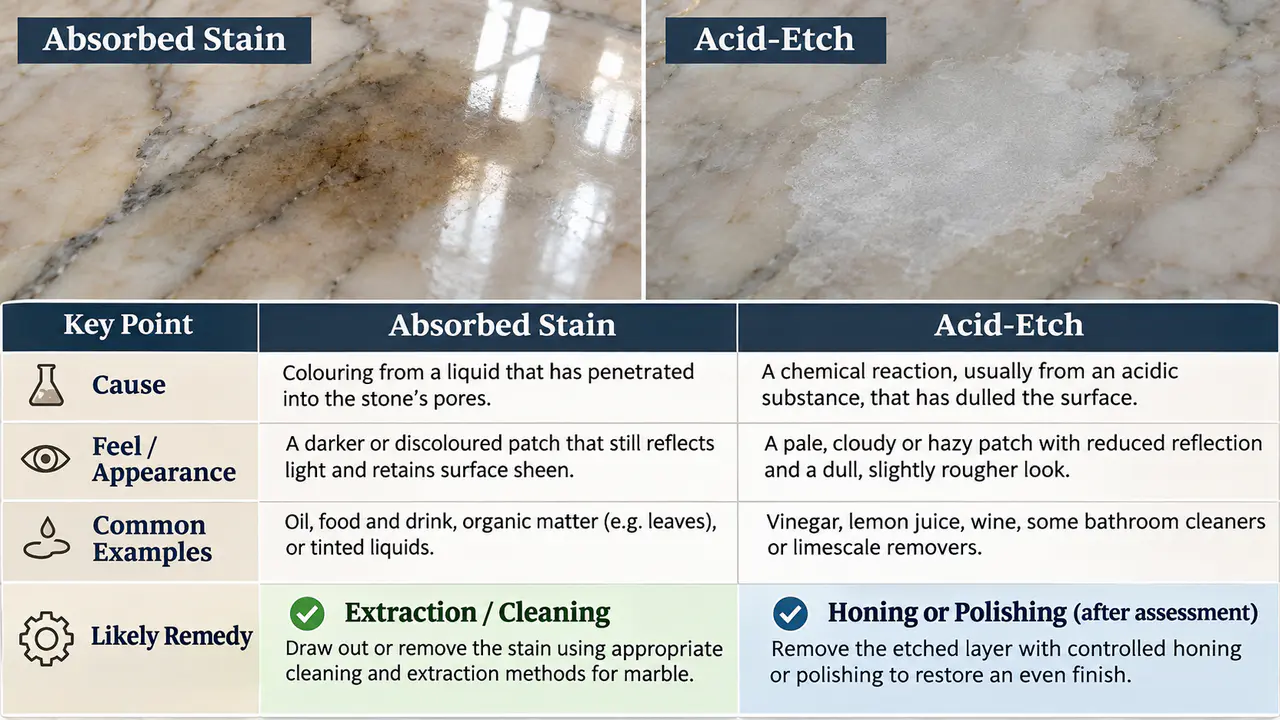
A stain is discolouration caused by material entering the stone. An etch is damage to the surface itself. Most marble contains calcite, which reacts with acids: the surface becomes chemically roughened, rather like eggshell dissolving in vinegar.
Wine, fruit juice, vinegar and acidic cleaning products can therefore cause an etch as well as a stain. Removing the colour may reveal a dull patch underneath; that does not necessarily mean stain removal has failed.
Cleaning cannot reverse etching. Light damage may respond to compatible specialist repolishing. Deeper etching may need diamond honing followed by polishing, or refinement to match an existing honed finish. These processes remove stone permanently, so the treatment must suit the damage, tile thickness and installation condition.
Do not keep scrubbing a dull patch or apply household polishing compounds in an attempt to restore shine. Local treatment can create a noticeably different reflection from the surrounding tiles.
Choosing treatment for an absorbed stain
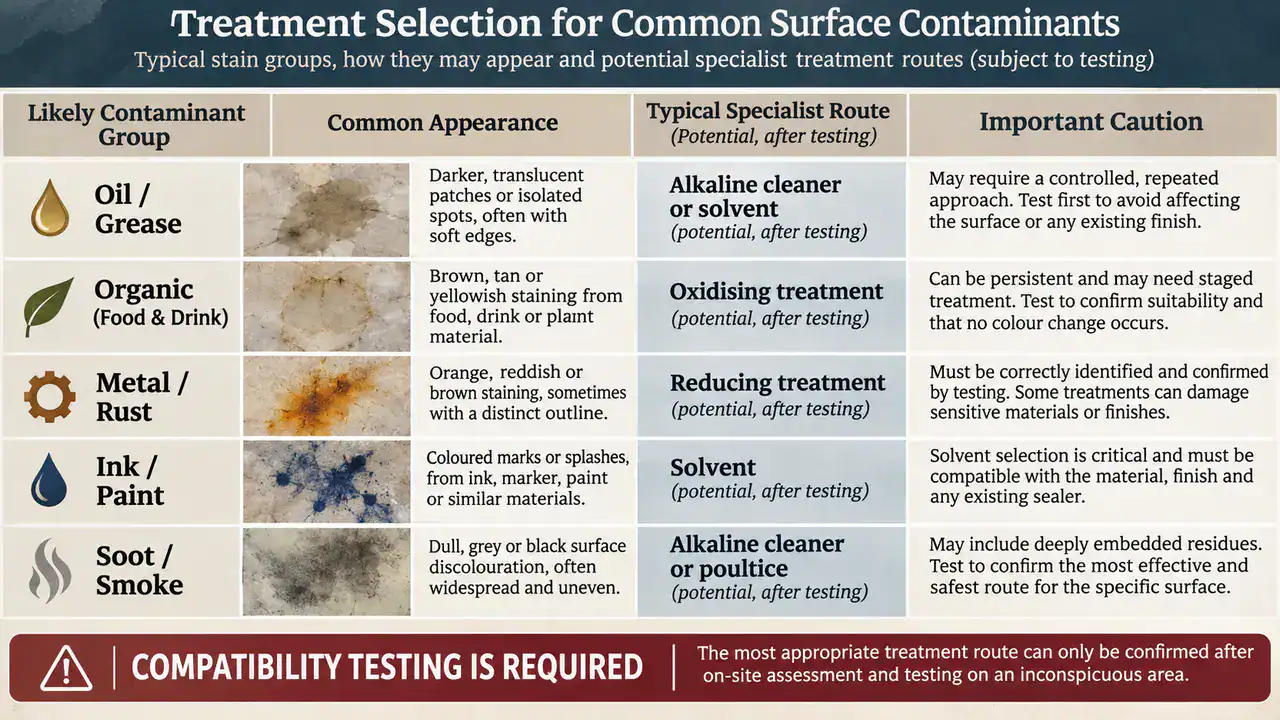
The likely contaminant matters more than the colour of the mark alone. A specialist may select a marble-compatible alkaline cleaner, solvent, oxidising treatment, reducing treatment or poultice after testing. These are different treatment routes, not interchangeable household remedies.
Oil, grease and cosmetics
Cooking oil, grease and some make-up can leave dark patches. Surface grease may respond to compatible cleaning, but absorbed oil may need a specialist solvent-based or poultice treatment. Repeated scrubbing will not reliably extract contamination from within the stone.
Tea, coffee, food and other organic staining
These spills may leave brown or yellow discolouration. A specialist may use an appropriate oxidising treatment or poultice, depending on the contaminant, stone and existing sealer. Acidic food and drink can also etch the surface, so colour removal and finish correction may be separate tasks.
Rust and other metal staining
Metal objects can leave stains that follow their shape. Orange-brown marks may also involve iron-bearing minerals within the stone. Do not use a general rust remover unless it is specifically confirmed as compatible with marble; acidic formulations can damage it. Deep internal iron oxidation may only partly improve or may remain.
Ink, paint and unidentified coloured marks
Identify the ink or paint type where possible and retain its packaging. Treatment depends on its chemistry and penetration. Avoid experimenting with household solvents: compatibility with the stone, sealer and surrounding materials must be checked first.
Soot and smoke marks
Distinguish loose surface contamination from absorbed staining before wet cleaning. Avoid rubbing loose soot into the stone. Persistent discolouration around a fireplace warrants specialist assessment rather than repeated general cleaning.
How does a marble poultice work?
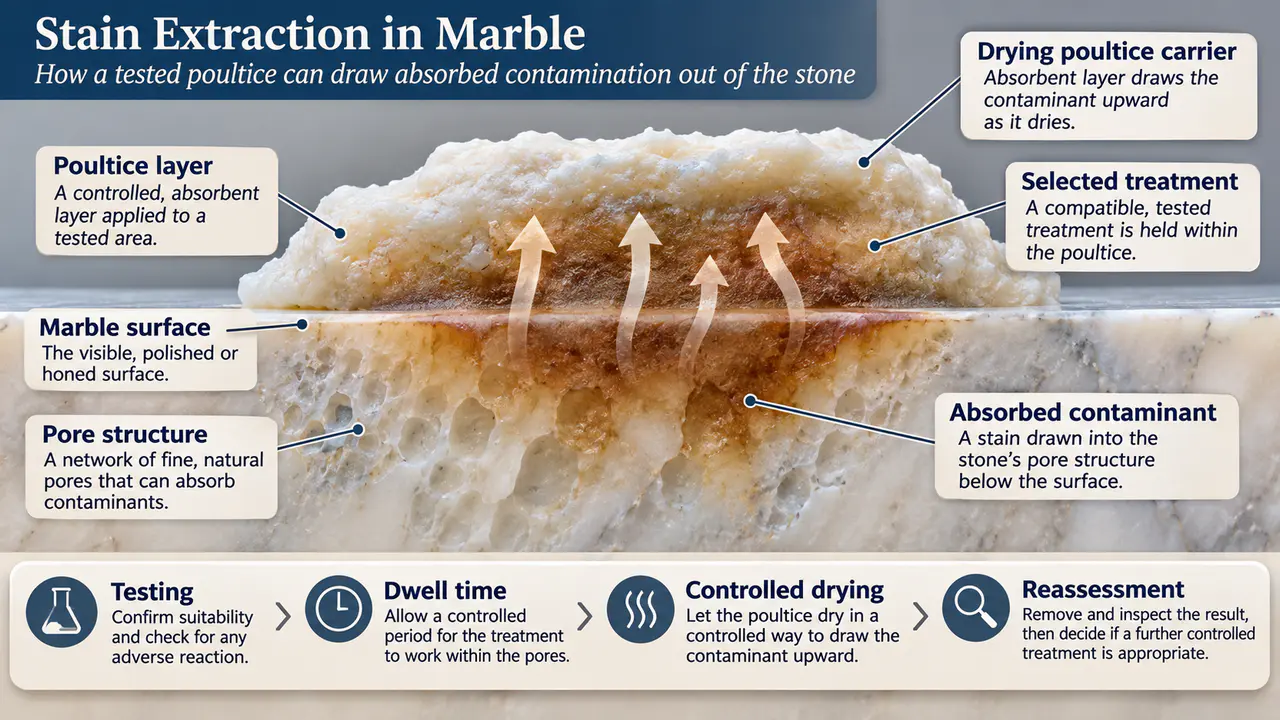
A poultice combines an absorbent carrier with a treatment selected for the stain. It holds the treatment against the affected area and allows mobilised contamination to migrate into the absorbent material as it dries.
It is not simply any household powder mixed into a paste. The active treatment, carrier, covering method, contact time and removal procedure must suit both the contaminant and the marble.
- Test in an inconspicuous area and allow it to dry before judging any colour or finish change.
- Follow the selected product’s instructions rather than a generic overnight recipe.
- Protect nearby materials and follow ventilation, glove and eye-protection requirements.
- Assess the dry result before considering another application.
Some stains need more than one controlled treatment, but repetition is not automatically helpful. Stop if the surface changes, the mark spreads or further applications produce no noticeable improvement. Deep staining may not be fully removable.
A safe DIY poultice for minor organic stains
For small, recent organic stains—such as tea, coffee, or food marks on light-coloured marble—a basic DIY poultice can sometimes lift absorbed discolouration safely. Only attempt this on confirmed organic staining; it will not correct acid etching, and using the wrong liquid on oil, rust, or dark stone can worsen the mark.
What you need:
- An inert absorbent powder: Unscented white kaolin clay, diatomaceous earth, or a proprietary stone poultice powder. Avoid coloured clays or gritty household powders that could scratch or transfer pigment.
- A compatible liquid: Clean distilled water, or a standard 3% (10 vol) plain hydrogen peroxide solution for light-coloured marble only. Do not use peroxide on dark or heavily pigmented marble, as it can lighten the natural colour of the stone.
- Application tools: A plastic or wooden spatula, breathable paper masking tape, and clear plastic food wrap.
- Pre-wet the area slightly. Dampen the stained marble with clean distilled water so the stone’s pores accept the treatment evenly rather than pulling liquid in too aggressively.
- Mix to a thick paste. Combine your powder and chosen liquid in a clean plastic bowl until it reaches the consistency of thick peanut butter—moist enough to cling, but not runny.
- Apply and cover. Spread a layer roughly 5–6 mm (about a quarter-inch) thick over the stain, extending 10–15 mm past the edges. Cover with plastic wrap and tape the edges down to slow the initial drying, then prick a few small holes in the plastic so moisture can evaporate gradually.
- Let it dry completely. Leave the poultice undisturbed for 24 to 48 hours until the paste has dried to a crumbly powder. The extraction happens as the moisture evaporates upward.
- Remove, rinse and assess dry. Gently lift the dried powder with a plastic scraper, wipe the area with a clean cloth dampened with distilled water, and allow the stone to dry fully before judging the result.
If the mark lightens slightly, one controlled repeat may help. If there is no change—or if the surrounding stone appears dull—stop and seek specialist advice before trying stronger chemicals.
Water marks and white deposits need a different approach
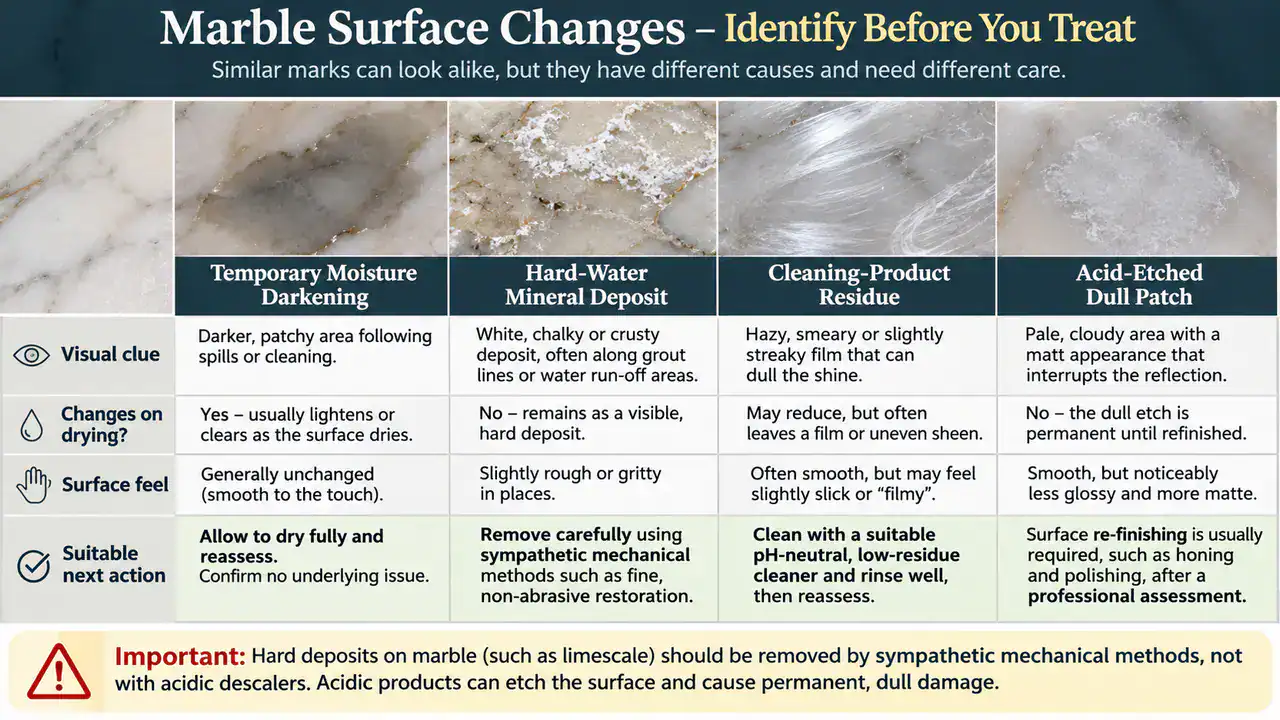
A “water stain” may be temporary moisture darkening, a mineral deposit, residue or an etched area. Let the floor dry and establish which is present before treating it.
Hard-water deposits are particularly relevant in bathrooms and wet areas. On marble, they require sympathetic mechanical removal—not acidic descaling. Aggressive scraping or abrasive pads can scratch the finish, so bonded deposits are best assessed by a specialist.
Loose white salts, known as efflorescence, can appear as moisture moves through a floor and evaporates. Gently collect loose dry material with a soft brush and suitable vacuum without grinding it into the surface. If deposits recur, the next step is to assess floor moisture movement, bedding or subfloor conditions and their implications for treatment. White deposits alone do not establish their source.
Do not apply a coating to conceal recurring salts or unexplained darkening.
When professional treatment is the safer choice
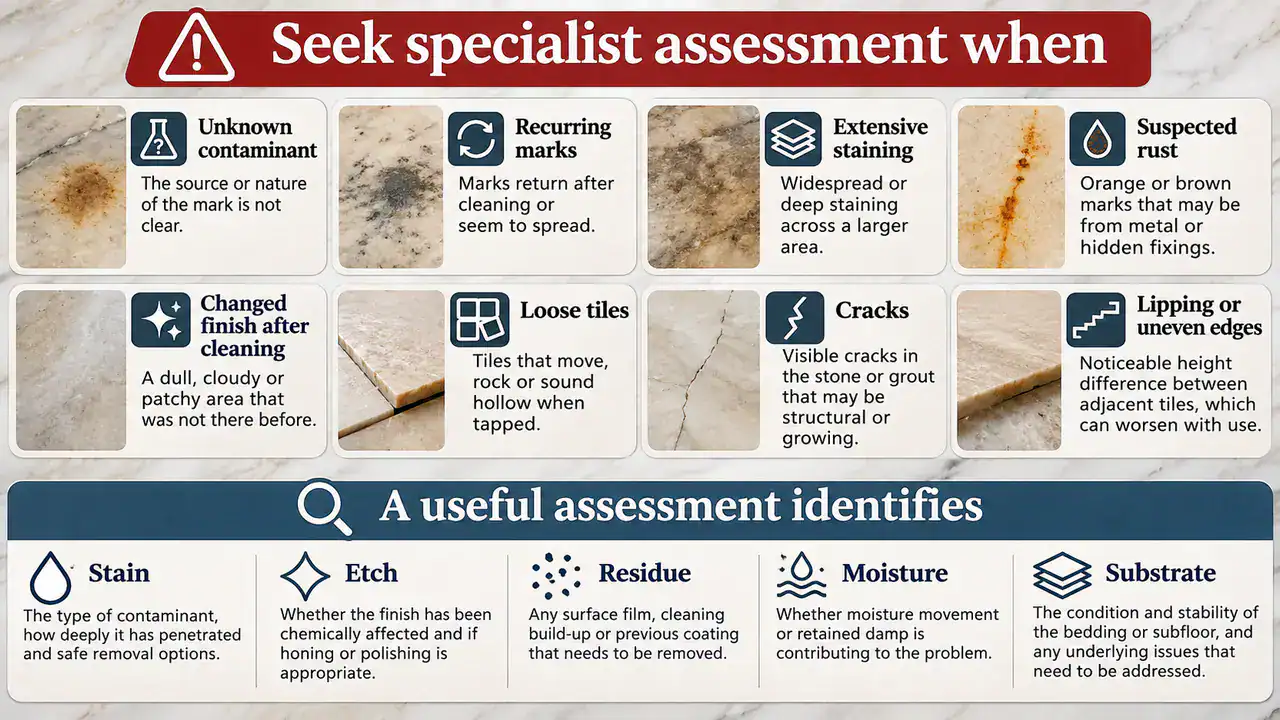
Seek specialist advice when the contaminant is unknown, the mark is extensive or recurring, metal staining is suspected, or previous attempts have changed the finish. Loose tiles, significant cracks and uneven edges also need assessment before abrasive work.
A useful assessment should distinguish contamination from damage, identify a suitable test treatment and explain the likely limitations. Grinding or honing is not a dependable substitute for extracting a deep stain: the discolouration may extend beyond the layer that can safely be removed.
Professional deep cleaning also involves controlled agitation, thorough rinsing and extraction of used solution. Leaving dissolved dirt or treatment residue on the floor can cause re-soiling and interfere with subsequent sealing.
Will sealing stop the stain coming back?
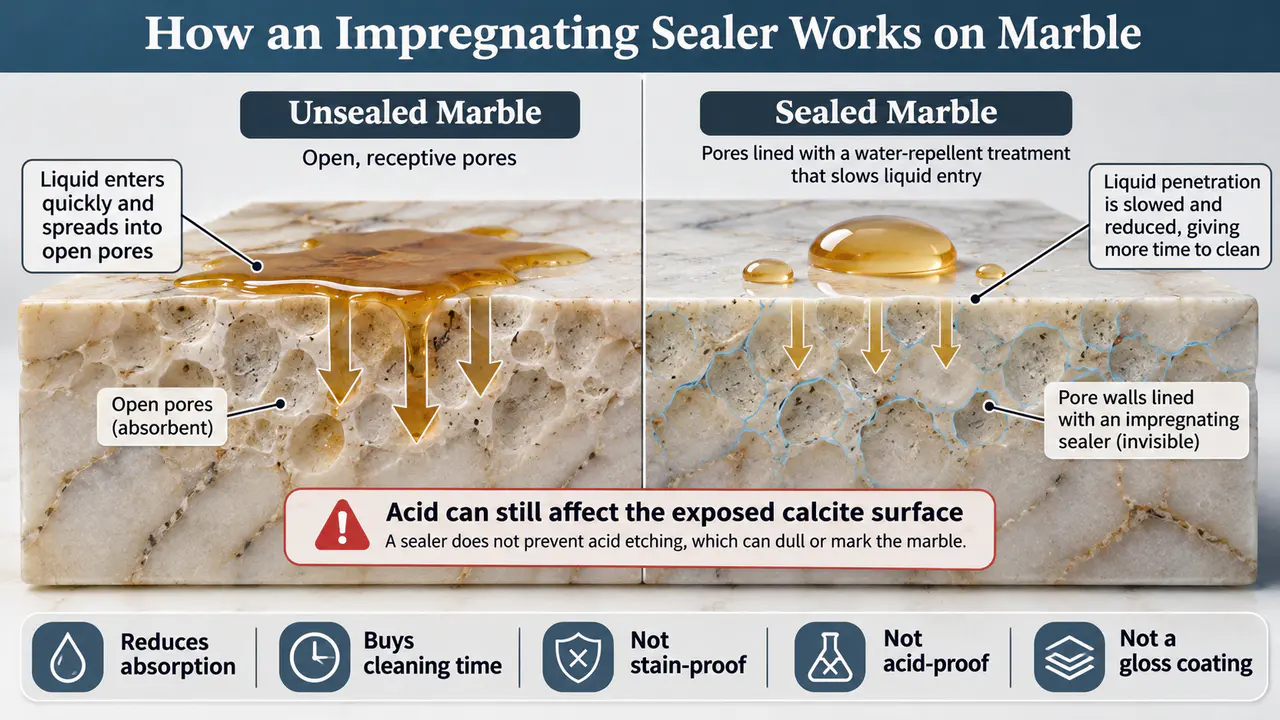
A suitable impregnating sealer reduces liquid absorption and gives you more time to remove spills. It penetrates the stone without forming a surface film. It does not make marble stain-proof, prevent acid etching or scratching, or create a polished finish.
After professional marble honing or polishing, Abbey Floor Care normally uses a suitably selected impregnating sealer following complete slurry removal and appropriate drying. Product choice and timing depend on the marble, existing treatment and site conditions. Surplus sealer must be removed before it dries to prevent haze and streaks.
A topical, film-forming sealer sits on the surface and is not the standard recommendation for marble. It has additional adhesion, moisture and maintenance requirements; it should not be used simply to hide a stain or dull patch.
There is no universal annual resealing rule. Reassess protection according to absorption, exposure, maintenance and the sealer manufacturer’s guidance.
Keep future stain removal straightforward
- Remove spills promptly, particularly acidic drinks and oily foods.
- Dry sweep or vacuum with a suitable non-scratching head before damp mopping.
- Use a low-residue pH-neutral cleaner approved for the floor and finish.
- Keep grit-controlled entrance mats clean, and use trays beneath products likely to drip.
- Prevent prolonged contact with wet metal objects and check protective furniture feet.
The key decision is whether the mark needs cleaning, extraction or surface correction. Start with the least aggressive compatible cleaning, assess the dry result and avoid escalating to stronger chemicals without identifying the cause. For the wider maintenance and repair picture, see the marble care, cleaning, repair and restoration guide.

David Allen — Abbey Floor Care
David Allen of Abbey Floor Care has more than 30 years of hands-on floor restoration experience. His experience includes marble cleaning, stain treatment, honing and polishing, with particular attention to distinguishing absorbed staining from surface damage.
Recent Posts:
We work throughout the country, just some of our work counties:
Copyright © 2026 Abbey Floor Care. Tile And Natural Stone Cleaning Consultants FAQ - Privacy Policy - Terms And Conditions
Abbey Floor Care is a participant in the Amazon Services LLC Associates Programme, an affiliate advertising programme designed to provide a means for websites to earn advertising fees by linking to Amazon.co.uk. As an Amazon Associate, we earn from qualifying purchases.