How to Clean Ceramic Tile Floors Safely in Stirling
Last Updated on September 28, 2026 by David
To clean ceramic tile floors safely, vacuum loose grit, use a pH-neutral tile cleaner on a manageable section, agitate gently, remove the dirty solution, rinse with fresh water, and dry the surface before checking it. Ceramic tile floors that still look dull, streaky, or dirty after regular mopping usually need the contamination identified before anyone simply cleans harder. In Stirling homes, the visible issue often sits in grout joints, textured grooves, or a film left by previous products, rather than within the factory-finished tile itself. This guide outlines a controlled deep-cleaning sequence that protects the glaze, distinguishes common residues, and shows where cleaning reaches its limit.
A cleaner sequence for a floor that keeps looking dirty
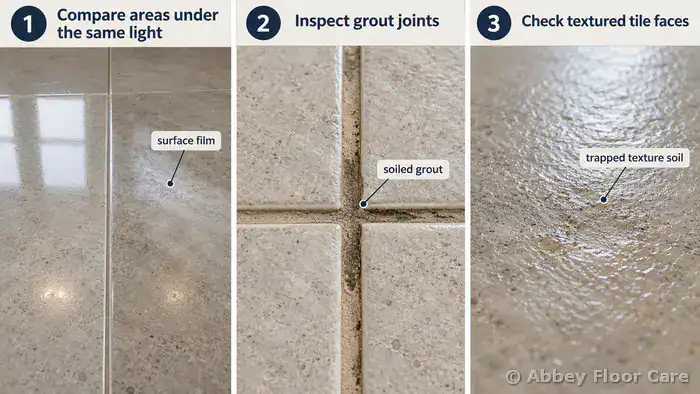
When a ceramic tile floor still looks dirty after routine cleaning, compare the grout joints and textured areas with a cleaner part of the same floor, under the same light, before assuming the tile itself is stained. A cloudy film points towards grout haze, which is installation residue and requires a suitable haze-removal treatment; darkened joints usually indicate soiled grout; and deposits in wet areas suggest soap scum or limescale. That simple comparison helps prevent the wrong treatment spreading residue across the floor.
Glazed ceramic tile normally has a sealed, non-porous face, so visible dullness is usually contamination sitting on the surface, within the grout, or in the texture. The cleaning sequence should therefore begin with identification, then move through dry preparation, controlled wet cleaning, agitation, rinsing, and final verification. The broader differences between ceramic and porcelain floors are covered in this ceramic and porcelain floor-care guide, but the process below stays focused on ceramic tile cleaning.
- Compare the floor in angled light before wetting it. A cloudy film across the tile face suggests dried installation residue, whilst darker joints point to contamination concentrated in the grout. Note whether the affected area is beside a cooker, beneath taps, around a shower, or across a high-traffic route.
- Identify cement-based haze before selecting the chemistry. This is a thin cement film left after grouting; it appears as cloudy tile faces or pale smears; and a suitable tile-and-grout treatment, followed by agitation and rinsing, can remove it where it has not bonded permanently.
- Separate polymer-bound haze from ordinary cement residue. This is a tenacious film containing a modern grout binder, and it can leave the floor matt, cloudy, or patchy after installation. It needs a staged chemical treatment rather than repeated acid washing.
- Check wet areas for limescale. This consists of mineral deposits left as hard water evaporates; the homeowner may see white crusts, water spots, or a chalky edge near taps and shower doors. Targeted mineral treatment and thorough rinsing address removable scale.
- Look for soap scum around bathroom tiles. This mixed film contains soap, body oils, and mineral residue; it feels smeary and tends to attract dust. Controlled cleaning removes the film, whilst improved ventilation and drying help reduce its return.
- Inspect kitchen tiles near the cooker for cooking-grease build-up. This consists of accumulated oils and food residue; it often shows as a sticky film or darker splashback and floor edges. A tile-safe degreasing stage removes the residue before rinsing.
- Check damp grout and silicone for mould spores. This condition is biological growth encouraged by moisture; black or green marks may appear in grout joints or sealant. Appropriate mould removal, drying, and renewed ventilation address visible contamination, although deeply stained grout may need renovation.
- Compare grout colour once the tile faces have dried. Discoloured grout results from soil absorption and colour degradation within the joint; it appears darker or patchier than the surrounding tiles. Deep cleaning can remove surface contamination, but permanent colour change requires a separate recolouring or re-grouting decision.
Dry preparation comes next. Loose dust, crumbs, grit, and small particles can otherwise turn into an abrasive paste during wet work. Vacuum the floor using a hard-floor head, or sweep it with a soft brush, then remove furniture and floor coverings so the full installation can be assessed. A microfibre mop can collect fine dust after vacuuming, but it should not replace removal of heavier grit.
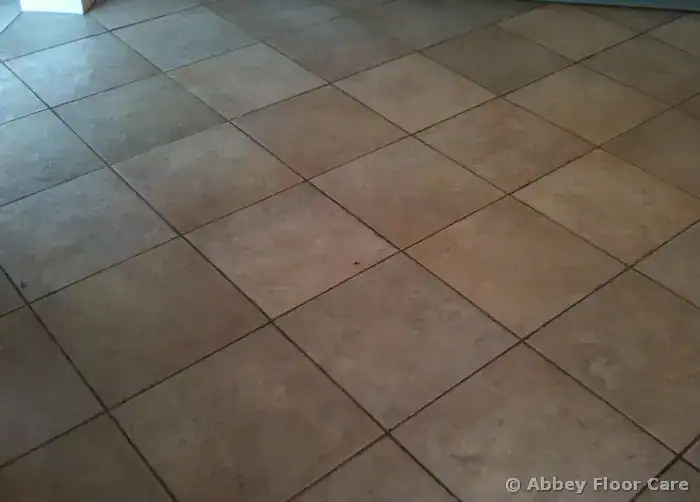
Water testing should follow dry cleaning, not come before it. A small area treated with lukewarm water can show whether the floor carries detergent film, but it will not identify every deposit; note whether the wet patch becomes clearer, stays cloudy, or reveals darker grout. A dual-basin bucket keeps dirty recovery water separate from clean rinse water, reducing redeposition.
Routine maintenance products can create a residue lock-in cycle when detergent film remains after each mop. Residue accumulation gives soil a tackier surface, soil bonding makes the next cleaning pass less effective, and redeposition returns loosened contamination to grout joints. A floor caught in this pattern needs controlled extraction, not more product.
Apply a suitable cleaner to a manageable section and keep the surface evenly wet for the label’s stated dwell time. Prevent the product from drying at the edges, protect adjacent timber or painted surfaces, and work from the least contaminated area towards the dirtiest. Washing-up liquid, vinegar solution, and heavily fragranced supermarket products can leave the very film that makes a floor appear streaky.
Agitation should suit the surface rather than attack it. A soft nylon bristle pad provides gentle agitation on smooth areas, whilst a polypropylene brush reaches recessed grout and textured tile grooves through controlled bristle action. Textured tiles can hold dirt in their grooves even where the visible face appears clean, so brush both across and along the pattern before lifting loosened soil with clean water.
Rinse each working section as it is completed rather than waiting until the whole floor has been scrubbed. Remove the dirty solution with a mop, squeegee, or wet recovery system, then rinse with fresh water until no slippery feel or visible film remains. This matters particularly after grease removal, mould treatment, or any stronger product concentration.
Dry the floor with clean towels, a lint-free cloth, or controlled airflow before making a final judgement. Damp ceramic can look brighter than it will when dry, whilst wet grout can temporarily disguise uneven colour. Once the surface is consistently dry, check corners, thresholds, grout lines, textured grooves, and areas beside kitchen or bathroom fittings.
Persistent cloudy patches after correct rinsing may indicate bonded installation residue rather than ordinary soil. Recurring white deposits may point to continuing hard-water exposure or moisture movement, whilst grout that remains dark after extraction may have permanent staining or chemical colour loss caused by previous chemical exposure. Chemical colour loss is permanent, so record it separately rather than responding with increasingly aggressive scrubbing.
Cleaning an existing glaze never means refinishing it. Abrasive pads, sandpaper, polishing compounds, and metal edges can leave fine scratches in glazed surfaces; those marks permanently increase abrasion risk and trap future soil. Guidance on safe ceramic surface treatment also explains why polishing ceramic tiles does not remedy a damaged factory finish.
Why stronger products can make the floor worse
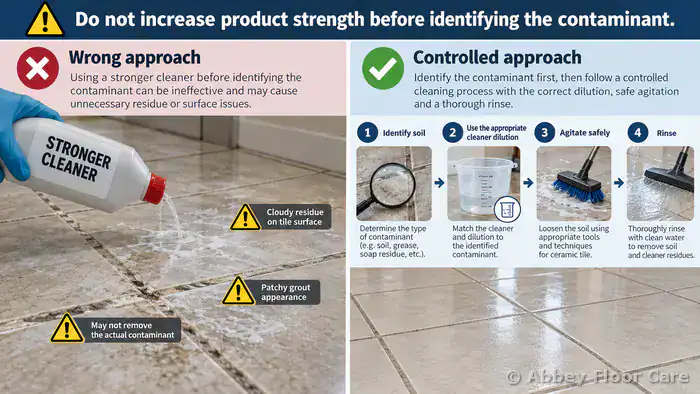
Using a stronger product on ceramic tile before identifying the contaminant can make the result worse. Check across the floor after rinsing to see whether residue or uneven grout colour remains. A high-alkaline cleaner suits grease, biological soil, and detergent build-up because alkaline pH supports degreasing, emulsification, and organic soil removal, but label dilution must be followed and adjoining materials protected.
An acidic cleaner suits selected mineral contamination, including limescale, calcium deposits, and suitable cement residue, because mineral dissolution targets those films. But acidic pH does not make it a universal cleaner: acid-only treatment cannot break polymer bonding in a tenacious installation film and may affect vulnerable grout. A test patch and controlled dwell time remain essential.
A two-stage polymer haze treatment uses alkaline chemistry first for polymer dissolution, followed by an acidic stage for the remaining mineral film. Ventilation, gloves, inconspicuous testing, surface protection, and thorough rinsing are control points, not optional extras. Homeowners comparing products can use this ceramic tile cleaner selection guide to match the product to the contamination rather than choosing by strength alone.
The small kit that keeps cleaning controlled
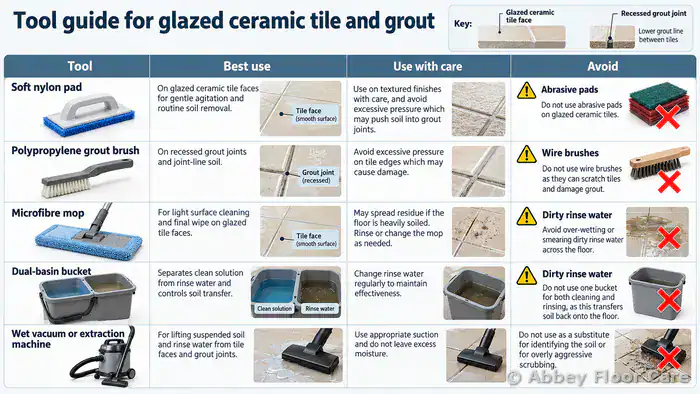
Controlled cleaning equipment should suit the installation rather than be used indiscriminately. Inspect tile texture, grout depth, and soil level before selecting hand brushes, rinsing equipment, or mechanical agitation. For many domestic floors, a soft nylon pad, polypropylene grout brush, microfibre mop, dual-basin bucket, clean towels, gloves, and ventilation provide the basic level of control needed.
A micro-particle abrasive cleaner should only be introduced where its micro-particles form a genuinely non-scratch slurry for the specific glazed surface. Even soft abrasives need gentle agitation and careful rinsing. An oscillating scrubber can improve grout agitation on textured flooring when soft brushes and tile-safe detergent reach the joints without marking the glaze. The machine cleans the existing surface; it does not refinish it.
A rotary floor machine is suitable for larger areas or heavy soil when a trained operator controls the speed and uses an appropriate pad attachment. The machine supports mechanical agitation, whilst a wet vacuum or slurry extractor provides mandatory slurry extraction to prevent redeposition. The distinction matters: rinsing moves dissolved contamination, whereas extraction removes it from the floor.
The difference a deep clean should make
If your ceramic tile floor shows dull faces and inconsistent grout after cleaning, compare a fully dry cleaned area with an untouched section under the same light. A successful deep clean reduces surface soil, clears removable film, and leaves tile faces visibly clearer, with grout joints showing more consistent colour. The comparison should demonstrate improvement rather than depend on a promise of complete restoration.
Discoloured grout is a joint whose porous structure has absorbed soil or suffered colour degradation; it appears as dark, patchy, or uneven lines. Extraction and agitation can remove removable contamination, whilst permanent staining needs a separate correction. Grout recolouring uses surface preparation, pre-treatment, and epoxy application to restore colour where the joint remains physically sound. This can provide a durable, non-porous frame around the tiles.
Re-grouting involves mechanical grout removal, joint cleaning, and new grout application; it is appropriate where joints are cracked, missing, or structurally weak. In those cases, joint repair rather than further cleaning corrects the failure. Cleaning should stop before it damages sound material, because chemically altered colour, failed joints, and deeply fixed staining do not become clean through increasingly aggressive chemistry.
Where removable contamination caused the dull appearance, the floor should look significantly better after intervention, and many installations regain a much clearer factory finish. A professionally cleaned and correctly protected floor is easier to clean and maintain than one carrying detergent film. Ongoing maintenance should remove grit before wet mopping, use pH-neutral chemistry, and avoid washing-up liquid because residue encourages renewed soil bonding.
When persistent problems need a deeper clean
Recurring deposits or ingrained grout soil suggest that a single routine treatment may not resolve the full ceramic tile cleaning problem. Persistent wet-area marks, returning haze, and uncertainty over the correct cleaning method indicate that the installation needs reviewing rather than the same product being applied again.
Hard water can recreate mineral deposits near taps and shower screens, whilst humid conditions can keep mould returning to grout and silicone. A deeper assessment separates continuing moisture or ventilation issues from contamination that a controlled cleaning pass can remove. It also confirms whether the floor needs extraction, targeted treatment, or a separate grout renovation decision.
Correct maintenance keeps ceramic tile floors clearer by removing loose grit before mopping and using a residue-free pH-neutral cleaner. Broader guidance on diagnosis, cleaning choices, and long-term care is available in the ceramic and porcelain floors hub, which places this focused method within the wider tile-care cycle.
Persistent staining, recurring mould, or patchy drying can justify professional help because specialist extraction controls slurry and reduces redeposition. A local service focused on ceramic tile floor cleaning should explain the contaminant, the safe sequence, and the result that cleaning can realistically deliver.

David Allen — Abbey Floor Care
David Allen has more than 30 years of experience in ceramic tile and natural floor care across UK homes through Abbey Floor Care. His work focuses on the controlled ceramic tile cleaning process covered here, including contamination identification, safe agitation, thorough extraction, and realistic decisions about grout renovation.
If you would like to apply to become the contractor for this area, please use the contact form.
Copyright © Abbey Floor Care.
We are proud to be your local stone floor cleaning, polishing, and restoration specialists for homes and commercial properties in Central Scotland.
With years of experience working with all types of stone floors, our friendly and professional stone floor cleaning services can’t be beaten on price or service.
FAQ - Privacy Policy - Terms And Conditions
Abbey Floor Care is a participant in the Amazon Services LLC Associates Programme, an affiliate advertising programme designed to provide a means for websites to earn advertising fees by linking to Amazon.co.uk. As an Amazon Associate, we earn from qualifying purchases.